Sudoku starts with a useful question: which numbers can still go here? You do not need to add, multiply, or calculate a score. You compare the numbers already on the board and remove choices that would repeat one.
This guide uses a small, original 4x4 practice board so you can follow a complete example without a crowded screen. A standard Sudoku has nine rows, nine columns, and nine 3x3 boxes. Our smaller version uses four rows, four columns, and four 2x2 boxes. The same no-repeat idea applies.
Start with the three rules
On this practice board, every row must contain 1, 2, 3, and 4 once each. Every column must do the same. Each box, outlined with a thicker border, must also contain those four digits once each. The printed numbers are fixed clues: keep them where they are.
A blank cell belongs to all three groups at once. A number must be allowed by its row, its column, and its box. Fitting one group is not enough if it repeats a number in another.
Look at one cell
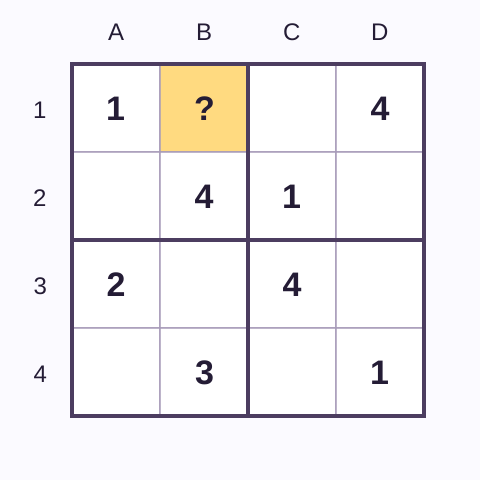
Find B1 first: column B, row 1. The small board uses digits 1 to 4.
The highlighted cell is B1, meaning column B, row 1. The first row already has 1 and 4, so B1 can only be 2 or 3. These possible values are called candidates. Neither is an answer until the other groups have been checked.
Column B contains 4 and 3. That rules out 3, leaving 2. Finally, check the upper-left box: it contains 1 and 4, with no 2. The placement is allowed by all three groups. You can place 2 at B1 without guessing.
Let one answer open the next move
Row 1 now reads 1, 2, blank, 4. Only 3 is missing, so C1 is 3. Its column and upper-right box allow that number too.
Next, look down column A: 1, blank, 2, blank. It needs 3 and 4. The second row already has a 4, so A2 must be 3. That leaves 4 for A4. One checked placement has helped you find several more.
You do not have to solve in this exact order. A row, column, or box with fewer empty cells is often a comfortable place to look. Choose the group that feels clearest, then check the crossing groups before committing to a number.
Know when to leave a cell alone
If a cell still has two possible numbers, keep both as candidates and move on. Choosing the first one because it looks neat is a guess. Another placement may remove one of those candidates later.
If a blank cell has no allowed numbers, check your earlier moves. A repeated digit in a row, column, or box can make the rest of the board appear impossible. Returning to the last certain step is more useful than forcing another number into place.
Check the finished example
Try completing the board on paper before opening the solution. Each row below runs from column A to D.
Show the full solution
- Row 1: 1, 2, 3, 4
- Row 2: 3, 4, 1, 2
- Row 3: 2, 1, 4, 3
- Row 4: 4, 3, 2, 1
Every fixed clue is preserved. Each row, column, and 2x2 box contains 1 to 4 exactly once. This practice board has one solution.
Take the idea into another puzzle
Try One Certain Sudoku Number for a fresh board and a single target cell. For a lighter warmup, Puzzlepia’s Daily Number Puzzle asks you to tap 1 to 16 in order. That starter is a number-order game, not Sudoku.
When you are ready for a full-size puzzle, play DaySudoku, a related external daily Sudoku site with a Key9 twist. Find the Key9 first, then continue the full Sudoku. Our 4x4 teaching board is separate from its live puzzle.
You can also browse Daily Puzzles or the Games hub for a different kind of short break. Keep the first goal small: find one number you can explain, check it, and build from there.